Friday, November 11, 2011

Badger, Mushroom, Snake

Yeah, yeah, so I'm late to the party. What can I say, I don't stalk stupidity.  Sadly, someone had to bring some more of said stupidity to my attention. Well this time I'm glad they did...because I laughed my a$$ off!!

Badgers are greedy, selfish, ugly creatures who just take what they want with no regard to others around them. So congratulations on making that comparison! All I know, is that I hope Romeo and Julia cause a fungus that will make some nails fall off!

Oh and by the way, lookie what I got! Karma was good to me =D

Two of each pair.
Essence Nail Art Twins!
Gabriella and Troy, Romeo and Julia, Chuck and Blair, Bella and Edward

And for a final note, the first thing I thought of in regard to it all:


HAHAHAHAHAHAHAHA

Maybe I'll get around to posting something real soon. Between the promotion at work and running a Secret Santa I've been a little busy =)

Sunday, September 25, 2011

Must Have Halloween Frankens continued

So another one of Amber's fabulous Halloween Frankens has donned my nails recently.

Fairy Frightening is very dimensional. It's a deep purple base with flashes of blue shimmer and 2 sizes of fuchsia colored glitter. It almost looks like Bad Romance had a baby with something like Illamasqua Boo! haha. You wouldn't guess it from the first coat, but it's definitely pigmented enough to be opaque in 2 coats. Usually large glitter is hard to work with. This one isn't very frustrating. It's not like you can just throw it on but it's really not that bad. Of course the large glitter tends to give the finish a slightly lumpy surface. But I love Gelous Basecoat. You put it over top of any glitter and it smooths everything out. Then your topcoat can give it some shine. Two coats of your regular topcoat might work well enough though if you don't have Gelous.

So here's a few pictures. All are Seche Restore for a basecoat, 2 coats of Fairy Frightening, 1 coat of Gelous and 1 coat of Out the Door.

Day Light:


Flash (check out that blue!):


You can see what I mean about the dimension! Lots of fun little elements making this just pop. I was complimented several time the day I wore this to work. 

Again, this lovely polish was created by Amber and her husband over at My Nail Graffiti. This and the other 3 wonderful creations in this collection are available for sale. At least until her glitter supply runs out, so don't miss out!

You can see my orginal post on her frankens Here.

=)

Monday, September 19, 2011

Must Have Halloween Frankens

So about 2 weeks ago this awesome girl named Amber posted about some Halloween inspired frankens that her husband decided to create. I know, I know. I thought the same thing too. "A married man playing with nail polish? This ought to be good."  Well the joke was on me because these babies were AMAZING! When I first saw her post about it in PaA I realized I needed these to add to my growing collection of Halloweenies. Lucky for me (and all of you as well) they decided to make these creations available for a reasonable price.

So on to the Pictures! (unfortunately I only got pictures of Pumpkin Patch swatched but I'll link you to Amber's swatches at the bottom)

I love the homemade labels!
And the pumpkin stickers are an adorable touch =)
Magic Dust has a slightly pinkish shimmery base with multi glitters including purple, blue and orange.
Fairy Frightening looks like DL's Bad Romance but cooler because is has a purple jelly base and blue shimmer.
Pumpkin Patch is a very happy orange with green glitters (in 2 sizes). 
Black Raven is an incredible blue/purple shimmer in a black base.

The green glitter is a great idea. This could have been opaque with only 1 thick coat but I opted for 2 thin. Unfortunately this doesn't quite get the orange color right. It's not as red. 

Here it is on my nephew (he's a funny little guy lol). It's 1 coat and a better idea of what the color looks like. 

Here's the best idea of the color of the orange. I decided to have a little fun the second day I had this on. I used Zoya's Ivanka for the leaves and vines.


I have played with all 4 of the polishes in this collection. They're all amazing. Black Raven is highly pigmented and is slightly slow to dry (but don't let that deter you). Magic Dust is so pretty and colorful. I can't wait to try it over various base colors. And although Fairy Frightening looks like it may be a DL Bad Romance dupe I think its much prettier. It seems to have more depth and dimension to it then Bad Romance. As with most large glittered polishes it may take a little extra work to get the big hexes where you want them but its definitely not that hard. And as usual I recommend using Gelous Basecoat over top to smooth out the glitters.

I am so glad I jumped on these when I did. They are super original and very fun. Anyone who like Halloween as much as I do will definitely want to get their hands on these ASAP! I can't want to see Amber's hubby's next creations!

For swatches of all 4 polishes as well as how to contact Amber to purchase these pretties you can visit her blog at My Nail Graffiti. 
Did I mention she's only as $16 for all 4 of them?? ;-)

Check out Fairy Frightening in my follow up post Here.

Monday, August 29, 2011

Galaxy Nails

I know, I know. How dare I not post anything in forever. I am truly sorry. Things have been majorly hectic around here. Between working 9 days stretches here and Hurricane Irene and other issues there, well I can barely keep up with PaA.

Speaking of, this week's Monday Mani theme was Galaxy inspired nails. And after posting my mani a tutorial was requested. I've never done an actual tutorial but I figured I'd give a pic-torial a whirls. So, here goes nothing!

To start, you're going to need some polishes. I'm using Nic's Sticks Silver-ella, Finger Paints Gallery Glam, Seeing Stars (a Hungry Asian franken), Claire's Mystical, and Nicole's Make U Smile. I didn't even use any other art tools. At most I had a piece of paper to dab off excess polish.
(all pics are clickable to enlarge)

I did 2 coats of Gallery Glam as my base color. It's a very deep bluish purple.

Up next I used Silver-ella to do the dust trails. I started by brushing off the excess that came out. I wanted to make it look as much like sponging as possible without having to go through the extra steps of finding and using a sponge.

Using just the end of the bristles I dabbed a trail across each nail. Vary the pattern in any way you desire.

Next I used Seeing Stars, which is holo and dark royal blue colored glitters in clear base. I more or less followed the same process as with Silver-ella and the same pattern in a semi sloppy manner. Again, going for the sponging look without the sponge.

Then I used Make U Smile to add larger "stars" in the open areas. I worked the brush in the bottle to get some of the larger hex glitters onto the tip so I could strategically place them where I wanted. Bonus of this polish was that it also has smaller silver glitters that ended up in random places giving some "stars" a more distant appearance.

Then to add just a touch more sparkle and to darken up a few spots I used Mystical (a dark, superfine blue and purple glitter in clear base). I just dabbed it over any spot I though turned out a bit too light or needed something extra. The first 2 nails have it, the 3rd not yet.

And finally some topcoat to seal it all together and Ta-Da! Far out spacey Galaxy Nails =)

And here's the picture that inspired the tutorial. 


I hope this is informative enough to help anyone who is interested in giving this look a try. Obviously any of these polishes can be substituted by other colors, brands, etc. Who knows, you may end up coming up with a better combination. I'd love to try this again using some other colors, maybe with something kind of pearly. I'm also curious as to how holo-y Silver-ella will look in the sun tomorrow LoL 

Thursday, July 14, 2011

100 Followers!!

It may have taken a few months and I may not post a whole lot, but I've finally reached the big ONE-ZERO-ZERO!!

I'd like to say thank you to each and every one of you personally. It warms my heart to know someone out there takes even a second of their busy lives to just glance at the randomness I spew =D

I really wish I had the means to have some fantabulous giveaway, but that's just not in the cards right now. Hopefully by some next big mile stone I'll have the means to make it's marking a bit more special.

So again, Thank You! Each and every one of you!

Monday, July 4, 2011

Independence Day

Happy July 4th to everyone! I've had a nice 2 days off work, went out with some friends, and relaxed around the house a bit. But with all the festivities I still don't feel like I've gotten nearly enough rest.

So my fabulous group Polish-aholics Anonymous has created a group unity activity. Each week we vote on a theme and then create a manicure to reflect that theme and post it on Monday. Thus our Monday Manis were born. These weeks theme was Patriotic. We had some awesome manis from girls from countries all over the world showing pride for their nation. And, of course, there were many many Independence Day inspired manis. They were all awesome and all so unique. This might have been the funnest week so far.

So I thought I'd post my design in here and explain a little as to what I did to make it.


For the thumb. middle and index fingers I used Nicole's OMB! (red) and Pure Ice Celestial (blue).
The stripes and dots on the middle and index are Kiss nail art.
The white on the thumb is Sinful Snow Me White, and its covered in OPI silver shatter.
For the pointer and pinky fingers I used Hard Candy The End for the background. Kiss silver nail art for the streamers. Ulta Pinata Yada Yada, Nicole Make U Smile and Let's get Star-ted, and some random almost Mad as a Hatter dupe for the firework explosions.

I know its a little messy but I ran out of time for clean up because it was time to get the spare ribs on the grill ;-)

Tuesday, June 28, 2011

Color Club Red Velvet

Traci and her blog sales and giveaways are going to be what fills out my polish collection haha and I love her for it!

Traci is running what seems to be an on going Blog Sale. She keeps updating and adding all kinds of new polishes at super fair prices and she ships fast and all over. So make sure you check it out.

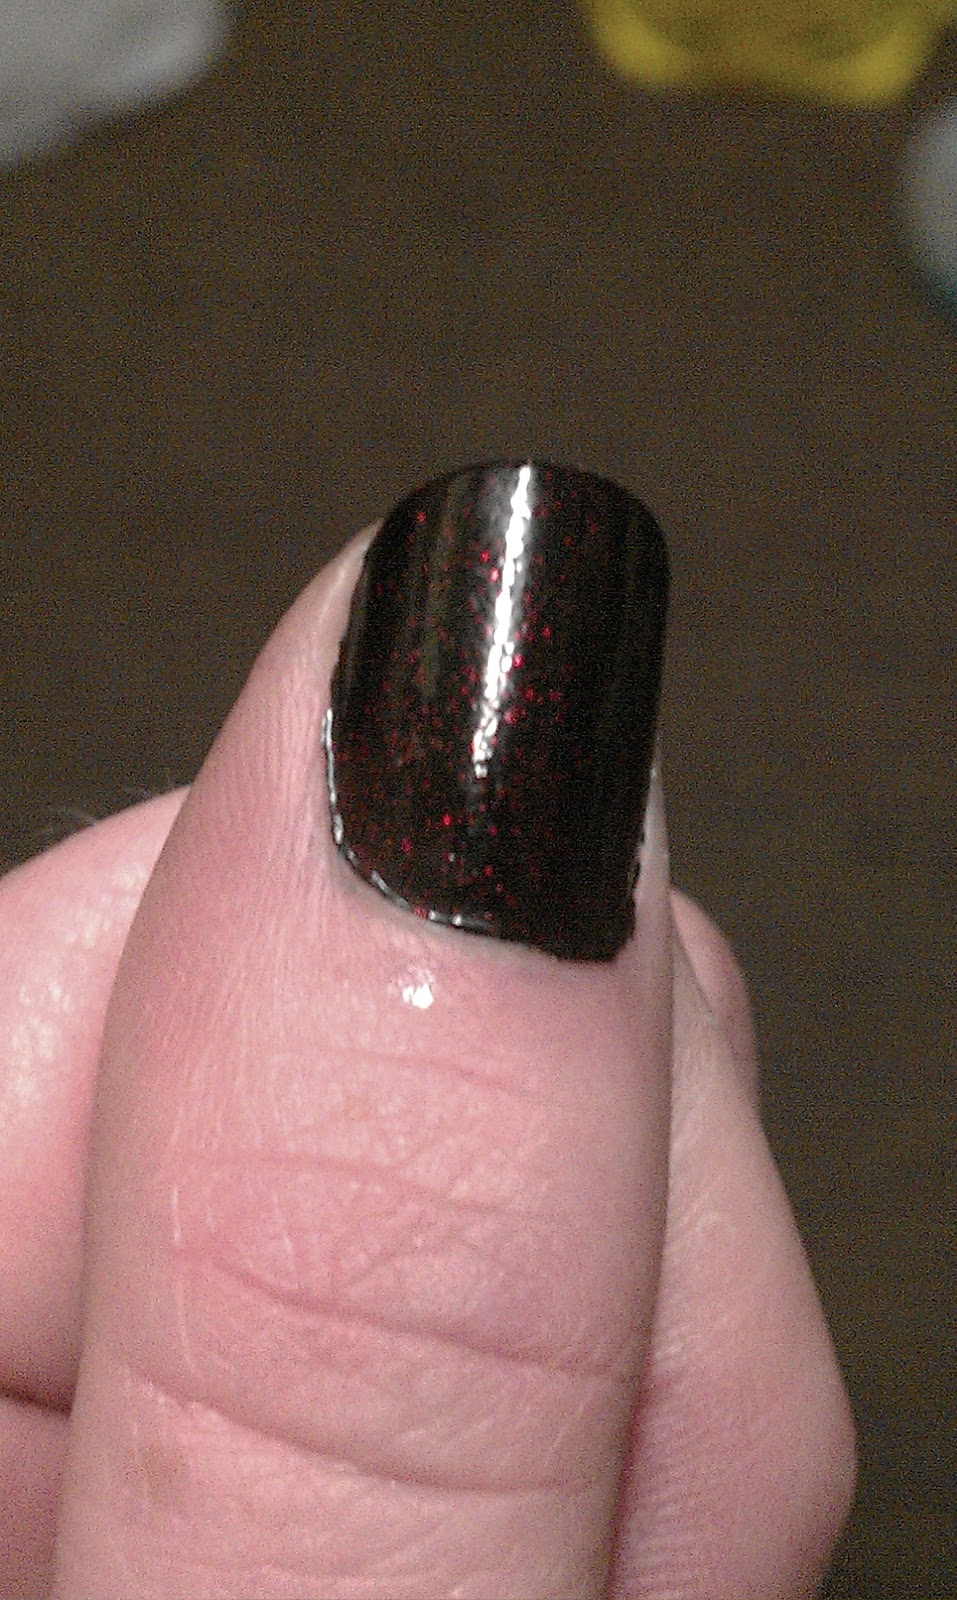
One of the gems I was able to snag from this sale was Color Club's Red Velvet from their Fall 2010 collection. Its a black jelly base with a whole lot of bright red glitter.

I can't believe Traci never got around to swatching this one. It's amazing. I should have done my True Blood mani and used this!

So this is basecoat and then 2 coats of Red Velvet (first thin, then a thick coat. I was too impatient to do 3 coats and if I had done all thin coats I think it would have needed the 3rd coat) and then Out the Door topcoat.


There's nothing I really need to say beyond the fact that these pictures don't do it fair justice. These are only a hint at how amazingly the red glitters pop from the base which is a very true black.